Last Updated on September 16, 2023
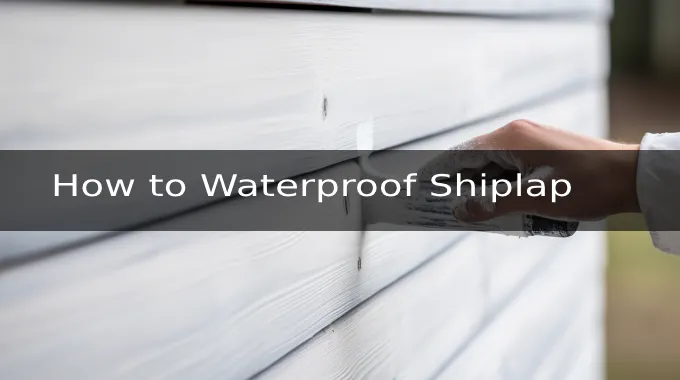
Waterproofing your shiplap helps to ensure its longevity and protect it from moisture-related issues. You should take the right steps to waterproof your wooden shiplap shed, rustic interior walls, or outdoor structures.
To waterproof shiplap surfaces, you need to clean them using eco-friendly cleaning solutions. Then, you’ll need to seal the area with a waterproof sealant or paint it mildew-resistant. After that, seal all the joints and gaps with waterproof caulking.
We’ll guide you through each step of the shiplap waterproofing process. By following this guide, you can preserve your board surfaces’ beauty and structural integrity.
How to Waterproof Shiplap: Step-By-Step Guide
To properly waterproof your shiplap, you need to follow a few key steps.
Step 1: Prepare the surface
Step 2: Apply a waterproof sealant or pain
Step 3: Let the shiplap surface dry
Step 4: Re-coat the shiplap surface
Step 5: Seal the joints and gaps
Let’s examine each step in detail so that you can successfully waterproof your shiplap surface.
Step 1: Prepare the Surface
To ensure the success of your shiplap waterproofing task, you need to prepare the surface properly. Start by cleaning the shiplap surface thoroughly using an eco-friendly solution.
You can use vinegar as an inexpensive and effective alternative to many branded cleaning products that may damage your wood’s finish.
Wet a cloth with vinegar and water solution and wipe down the shiplap surface. Make sure the surface is dry thoroughly before proceeding to the next step.
Step 2: Apply a Waterproof Sealant or Pain
Once you’ve cleaned and dried the surface, grab a paintbrush or roller and apply the waterproof sealant or paint evenly.
You must choose a high-quality exterior-grade waterproof sealant or mildew-resistant paint specifically designed for wood surfaces. These products are formulated to withstand the elements and provide long-lasting protection against water infiltration.
Using smooth, even strokes, coat the entire shiplap surface with the sealant or paint, covering every nook and cranny of the wood.
Pay extra attention to any joints or gaps between boards, as these areas are prone to water penetration.
Step 3: Let the Shiplap Surface Dry
After applying the sealant or paint and sealing the joints and gaps, you should let the shiplap surface dry completely. Typically, you can find this information on the product label. But it usually takes 24 hours for it to dry.
Step 4: Re-Coat the Shiplap Surface
To ensure maximum durability and waterproofing, applying another layer of sealant or paint to the shiplap surface is recommended. This additional coat will provide extra protection against moisture and other elements.
When re-coating, you need to follow the same method as before, ensuring even coverage across all surfaces. You should pay particular attention to joints and gaps, since they’re more susceptible to water damage.
Before proceeding to the final steps of your waterproofing process, let the recoat dry completely, usually 24 hours.
Step 5: Seal the Joints and Gaps
After applying the additional coat of waterproof sealant or paint and allowing it to dry, the next step is to seal the joints and gaps in the shiplap surface.
To effectively seal the joints and gaps, you’ll need to choose a waterproof caulking compound designed for exterior use. Look for a type that is resistant to water and temperature changes.
Cut the caulk tube’s tip at a 45-degree angle to create a small opening. The size of the opening will determine how thick your caulk bead will be.
Hold the caulk gun at a 45-degree angle and squeeze the trigger to apply an even bead of caulk along the joints and gaps. Move the gun smoothly to ensure a uniform line.
Use a caulk smoothing tool or your gloved finger to press and smooth the caulk, creating a neat finish. Wipe away excess caulk with a damp cloth or sponge before it dries. This will give your shiplap surface a clean appearance and prevent uneven drying.
Follow the manufacturer’s instructions for drying time, as it can vary depending on humidity and temperature. After it’s fully dry, inspect for any gaps or imperfections, applying additional caulk if necessary to achieve a watertight seal.
What happens if the shiplap gets wet?

If your shiplap gets wet, it can lead to swelling, warping, and sagging, compromising both its structural integrity and appearance.
When wood absorbs moisture, it expands, causing the shiplap to swell. This can result in uneven surfaces and misaligned joints, making your walls or ceilings look unattractive and uneven.
Also, the excess moisture can cause the wood to warp over time, further distorting its shape and compromising its functionality.
If left untreated, wet shiplap becomes a breeding ground for mold and mildew growth due to the ideal conditions provided by the moisture. This affects your shiplap’s aesthetics as well as your health.
So, it is vital to take measures to prevent water damage and ensure proper maintenance of your shiplap to avoid these issues altogether.
What kind of shiplap should you use in a bathroom?
When you decide to use a shiplap for a bathroom, opting for Moisture Resistant (MR) MDF shiplap is highly recommended.
Moisture-resistant MDF shiplap is specifically designed to withstand moisture and humidity. Because of this, it’s ideal for places where water can damage traditional wood.
Shiplap is engineered to resist swelling, warping, and decay caused by moisture, ensuring its longevity and visual appeal.
Waterproof Your Shiplap for Long-Lasting Beauty and Strength
When there is a chance of moisture exposure, such as in bathrooms or outdoor structures, take your time to waterproof your shiplap properly.
Following these steps ensures your shiplap retains its charm and strength. By cleaning, sealing, and re-coating the surface and diligently sealing joints and gaps, you build a robust defense against water damage.
Wet shiplap can result in swelling, warping, and even mold growth. To enjoy the beauty of shiplap without worries, choose moisture-resistant options for areas prone to dampness.
In the end, your well-protected shiplap will stand the test of time, keeping your space both stylish and structurally sound.