Last Updated on September 16, 2023
Installing wood shiplap over plaster walls is a creative and transformative way to add character, texture, and a touch of rustic charm to any room. This versatile design trend has gained popularity for seamlessly merging modern aesthetics with timeless elegance.
But do you know how to install shiplap over plaster walls so they’re more livable and stylish? You’ll need shiplap boards, a measuring tape, a saw, construction adhesive, and a level. Next, prepare your walls by removing any loose plaster or debris and ensure they are clean and smooth.
Then, locate the studs behind the plaster. You can use a stud finder or tap on the wall until you hear a solid sound. After that, measure and cut your shiplap boards to precisely fit each wall section’s length.
Here, we will explain to you each step of the shiplap installation process, from measuring and cutting the boards to securing them.
How to Install Shiplap Over Plaster Walls: Easy Steps
Over your plaster walls, you would like to install the wood shiplap. Well, here’s a step-by-step guide to help you get started.
- Step 01: Gather materials and tools
- Step 02: Preparation
- Step 03: Locate studs
- Step 04: Measure and cut shiplap
- Step 05: Apply construction adhesive
- Step 06: Start installation
- Step 07: Maintain level and spacing
- Step 08: Trimming and corners
- Step 09: Finishing touches
Step 01: Gather Materials and Tools
Ensure you have all the necessary materials and tools for installing wood shiplap over plaster walls. You’ll need shiplap boards, a level, stud finder, nail gun or screws, measuring tape, a circular saw or miter saw, construction adhesive, spacers, and appropriate safety equipment like goggles and gloves.
Step 02: Preparation
After removing any existing trim or molding, thoroughly clean and repair the plaster walls for a smooth surface. Start using a scraper or putty knife to remove loose paint or debris from the walls.
Next, use a mild detergent mixed with warm water to wash the walls, paying attention to any stains or dirt buildup. Rinse the walls with clean water and allow them to dry completely before proceeding.
Once dry, inspect the plaster for any cracks or holes. Follow the manufacturer’s instructions to use a patching compound designed for plaster repairs to fill these imperfections. Allow sufficient drying time before lightly sanding the patched areas until they are smooth and level with the rest of the wall.
Step 03: Locate Studs
To securely attach the wooden shiplap boards, use a stud finder to locate and mark the positions of the vertical studs behind the plaster walls.
Start by turning on the stud finder and running it along the wall in a slow, horizontal motion. The stud finder will emit a beep or display a light when it detects a stud. Once you’ve located a stud, mark its position with a pencil.
Continue scanning the wall until you’ve marked all the studs within your installation area. You should be precise with your markings, as they will be your reference points for attaching the wood shiplap boards later.
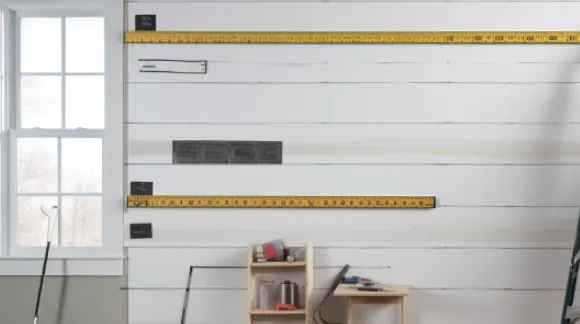
Step 04: Measure and Cut Shiplap
Use a tape measure to accurately measure from floor to ceiling and from corner to corner. Once you have these measurements, mark them on paper or note them on your phone.
Next, it’s time to cut the wooden shiplap boards to size. Carefully cut each board according to your measurements using a circular or miter saw. Consider any corners, windows, doors, or other obstacles requiring special cuts.
Step 05: Apply Construction Adhesive
Applying a thin, even layer of construction adhesive vertically on the back of each shiplap board before attaching it to the walls strengthens their bond. This will ensure your wooden shiplap installation remains secure and durable.
To apply the construction adhesive, start by squeezing a small amount onto the backside of each shiplap board. Use a putty knife or trowel to spread the adhesive evenly across the entire surface, covering all edges and corners.
The vertical adhesive application helps create a strong connection between the shiplap boards and the plaster walls. It allows for better weight distribution and prevents gaps or movement between boards.
Step 06: Start Installation
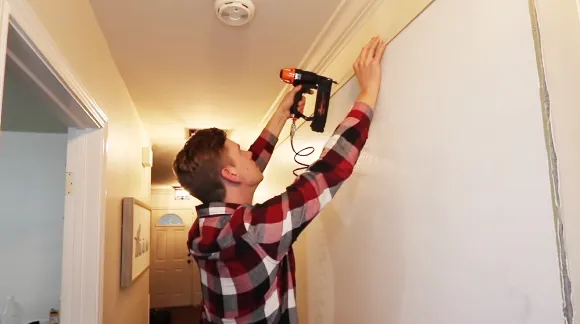
Start at one corner of the wall, preferably at the bottom. Take the first shiplap board and ensure its edge aligns perfectly with the wall corner. Use a level to ensure that the board is both horizontally and vertically level.
To secure the board to the wall, grab your nail gun or screws. Drive nails or screws through the board and into the marked studs behind the plaster. Attaching the wood shiplap to these studs is important for maximum stability. To hide them, drive nails or screws through the tongue of each board at a slight angle.
Continue this process with each subsequent shiplap board, ensuring they are tightly fitted together and securely fastened to studs and adjacent boards.
Step 07: Maintain Level and Spacing
To ensure a professional and uniform look, maintain the level and spacing of the wooden shiplap boards as you proceed with the installation. A level will help you ensure the boards are perfectly horizontal, creating a visually appealing finish.
As you place each board, insert spacers between them to establish consistent gaps. These gaps can be created using small objects like coins, keeping the spacing even throughout the installation process.
Step 08: Trimming and Corners
Measure and cut the shiplap boards precisely to fit corners, windows, and doors.
Using a miter saw, carefully create angled cuts for corners. This will ensure the wood shiplap boards seamlessly transition between adjacent walls, leaving no gaps or uneven edges. Take your time with each cut, ensuring that the measurements are accurate and the angles are precise.
Also, when trimming around windows and doors, be mindful of any obstructions such as handles or locks, that may affect the placement of the boards.
Step 09: Finishing Touches
Once all the shiplap boards are securely in place, fill any nail or screw holes with wood filler. After the filler dries, use sandpaper to smooth out any rough edges or surfaces, achieving a polished finish.
Now, you can leave the shiplap boards in their natural state or paint or stain them for a customized look.
If you apply paint or stain, let it dry completely before proceeding to the finishing touches. Once the paint or stain has dried, carefully inspect the shiplap boards for any imperfections or areas needing touch-ups.
Use a small brush or roller to apply another coat of paint or stain as needed, ensuring an even and consistent finish. Pay close attention to corners and edges, ensuring they are fully covered for a seamless look. After the final coat has dried, admire your newly finished shiplap wall.
With the finishing touches, your wood shiplap installation is now ready to be enjoyed for years.
What’s the ideal Gap between shiplap boards?
When installing over-plaster walls, it is recommended to leave a nickel thickness gap (about 1/16 to 1/8 inch) between shiplap boards to ensure proper wood expansion. Due to this small gap, the wood can expand and contract naturally with changes in humidity and temperature, preventing warping or buckling.
It also allows for slight variations in board width, ensuring that the gaps between each board remain consistent throughout the installation.
Can I install shiplap over uneven plaster walls?

For a level installation, you can address significant irregularities on uneven plaster walls by using additional adhesive or shims behind the shiplap boards. This step ensures that your wood shiplap has a smooth and professional finish.
Remember to secure the shiplap boards firmly into place, making sure they align perfectly with each other. These measures will help you achieve a flawless installation and create a beautiful backdrop for your space.
Transform Your Space with Wood Shiplap: Revamp Your Plaster Walls
Installing wood shiplap over plaster walls is a worthwhile project that can transform the look of your space. You can achieve a seamless and stunning result by following the step-by-step guide discussed above.
Remember to leave an ideal gap between shiplap boards for expansion and contraction. And yes, you can install shiplap over uneven plaster walls by using furring strips or shims to create a level surface.
Like shiplap, this project allows you to blend the old with the new, creating a harmonious balance in your home.