Last Updated on September 13, 2023
Cement board is an incredibly durable material commonly used in various construction projects due to its resistance to water damage. Despite its strength, cement boards can still become damaged over time by impact or other factors.
When this happens, it’s essential to know how to patch the cement board to ensure it remains intact and functional.
Patching cement board is a relatively straightforward process that you can complete without removing the entire sheet. By preparing the area, patching small or large holes, and finishing the patch, homeowners can easily repair their cement board and maintain its quality.
This instructive post offers clear guidance on how to patch cement boards, making repairs a hassle-free experience and eliminating any related discomfort.
How to Patch Cement Board: Step by Step
Patching cement boards require a few steps, but they can be done with ease if you have the right approach. To begin, follow these steps:
- Step 1: Preparing the Area
- Step 2: Patching Small Holes
- Step 3: Patching Large Holes
- Step 4: Finishing the Patch
Step 1: Preparing the Area
Before patching the designated area, properly prepare the surface. To do so, wipe the area with a clean, damp sponge. Make sure the sponge is free of any dirt or debris, as this can affect the effectiveness of the patching material.
Moistening the sponge with water, but not soaking it, is ideal as too much moisture can negatively impact the adhesion of the patching material. Once the surface has been wiped down, allow it to dry completely before moving on to the next step.
This will ensure no residual moisture or dampness that may affect the bonding of materials during application.
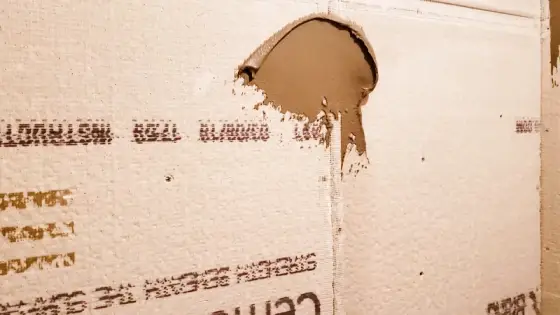
Step 2: Patching Small Holes
To repair small holes, groove the edges and mix thin-set mortar following manufacturer instructions. Apply the mortar with a putty knife or trowel to fill the hole evenly. Create a V-shaped groove for larger holes to ensure the patching compound adheres properly.
It is recommended to mix smaller batches of mortar because it takes less than 15 minutes to work. Use polymer-coated fiberglass tape on holes larger than 1/2 inch, overlapping the edges by half an inch and trimming excess tape.
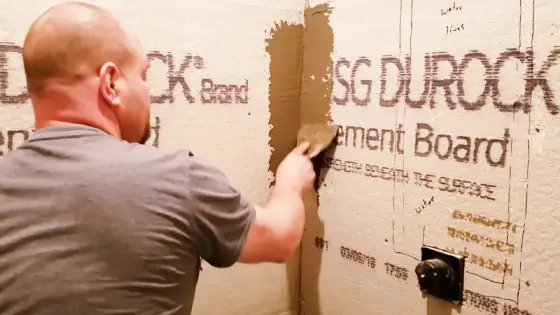
Step 3: Patching Large Holes
To fix large holes in the cement board, cut back the cement board with a carton knife or carbide-tip tool and uncover the studs on both sides of the damaged area. Don’t use power tools indoors, as inhaling silica dust can be dangerous.
After removing the damaged section, measure and cut a new cement board and attach it to the studs using corrosion-resistant screws. To make installation easier, pre-drill the screw holes. Remember to wear a respirator and eye protection while drilling. These steps will ensure a sturdy and durable repair.
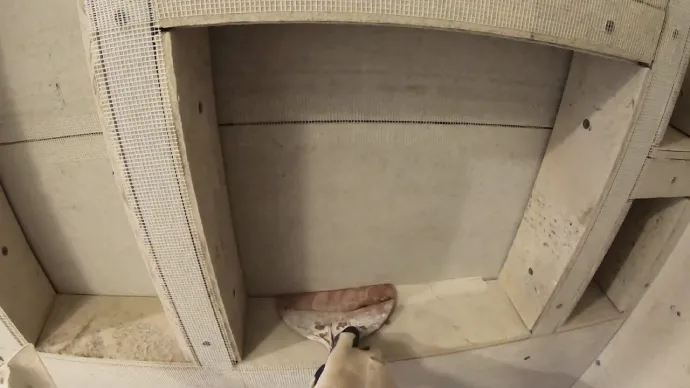
Step 4: Finishing the Patch
Finish the patch by applying mortar and fiberglass tape. Use appropriate sandpaper for sanding it smoothly for a professional finish. Apply the mortar smoothly to fill any gaps, and embed the fiberglass tape well for a strong bond.
Wear a respirator when working with cement-based products to protect your health. Once dry, sand the patch until it’s smooth and perfect. After that, add any finishing touches for the look you desire.
Note: It is crucial to follow a step-by-step process to ensure you get the best results possible. Skipping even one step can lead to subpar work, impacting the repairs’ longevity.
Can the cement board be patched without removing it?
You can fix small damages in the cement board without removing it, as long as the material is intact. Use a repair kit with mesh tape and joint compound to fix a small hole.
Achieve a flawless finish by cleaning and drying the area before applying mesh tape. Cover the tape with the joint compound and allow it to dry as instructed. In the end, sand it down to a dreamy smooth texture.
But, if the damage is large or a structural issue comprises the cement board’s strength, it is necessary to remove it to ensure safety and prevent further damage. Always assess damages carefully before attempting repairs or contacting a professional.
Can you paint or tile over the patched cement board?
When remodeling a bathroom, painting or tiling over the substrate’s patched areas may affect the final project’s appearance and durability. Patching cement boards with tile mortar for minor damages are possible, but replacing the entire board is generally recommended if the damage is significant.
If patches are made with tile mortar, sanding them down before painting or tiling is necessary. It’s important to note that patches may adhere better than undamaged areas, which could lead to moisture retention and mold growth.
Patched areas may be visually noticeable and unlevel. While patching can be temporary, replacing the damaged boards entirely for a more durable and visually pleasing outcome is better.
You can achieve a flawless finish for your repairs with these simple steps.
Can you install stone veneer over the patched cement board?
Stone veneer can be installed over patched cement board, but some important considerations must be remembered. Ensure the cement board is properly secured and free from any loose or damaged areas. If there are any weak spots, they should be repaired before moving forward with the installation of the veneer.
It’s a good idea to apply a base coat of mortar onto the cement board. This will provide a stable, level surface for the veneer to adhere to. The mortar helps to create a strong bond between the veneer and the cement board, ensuring a long-lasting installation. Once the mortar is set, you can install the stone veneer over the cement board.
Is silicone safe to use on cement boards?
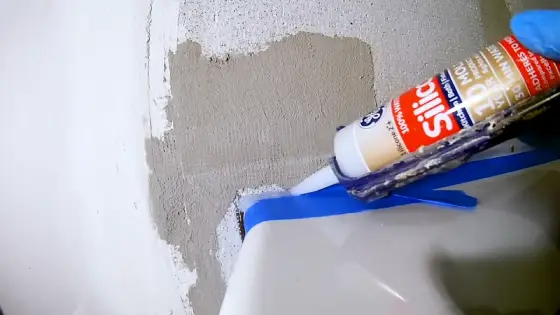
Silicone sealant is safe and effective for filling gaps between cement board sheets. It forms a waterproof barrier that prevents moisture from seeping through. Not all types of silicone are suitable for this purpose. Only use those specifically designed for use on cement boards.
Also, immediately wipe away any excess silicone with a damp cloth before drying. Excess silicone can be difficult to remove once it hardens. These guidelines help homeowners safely patch their cement boards without causing damage or compromising their structure.
Cement Board: Easy to Repair and Ready for a Makeover
Cement board is sturdy for floors, walls, and countertops. Despite its durability, cracks and holes can develop over time, but repairing them does not always require removing the entire board. The patched cement board can also be painted or tiled over, provided the surface is properly cleaned and primed.
When sealing around fixtures, use silicone caulk designed for concrete surfaces to avoid damage. The patched cement board will look new quickly with careful application and finishing touches.


