Last Updated on January 25, 2023
If your bathroom suffers from wet drywall, it can be tempting to call in a professional to do the job. But with the right tools and some guidance, you can repair your own wet drywall quickly and safely.
Repairing drywall involves gathering all required materials, analyzing the damage closely, and preparing for repair.
After removing old wallboard and moisture, installing fresh frames and plaster is a must before sealing joints with texture coatings that get your walls looking great again. Finally, complete it off with vibrant colors of paint to bring life back into any room’s decor.
Don’t worry about wet drywall in your bathroom. With these simple steps, you’ll have it all patched up and looking good as new without breaking a drop of sweat. We’ll take care of the details to repair this pesky problem.
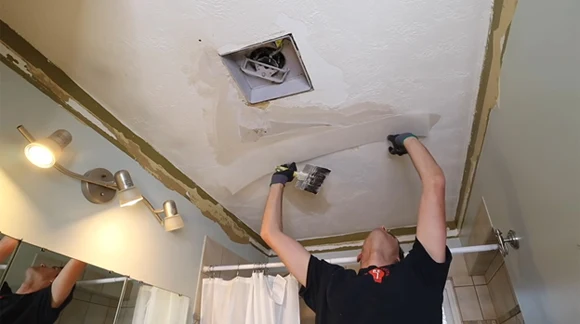
Detailed Steps on How to Repair Wet Drywall In Bathroom
Whether it be a burst pipe, flooding, or some other misadventure, it’s no fun when wet drywall appears in your bathroom.
Look at our comprehensive guide to get you through those chores so the room can go back to looking its best. Ready? Let us show you how quickly drywall water damage restoration can be done with ease.
Step 01: Collect the Tools and Materials
To successfully repair wet drywall in the bathroom, it is important first to gather all the necessary tools and materials.
This includes a flashlight or moisture meter to inspect the damage, a Sawzall or reciprocating saw for cutting out water damaged drywall sections of wall framing and drywall, and a vacuum cleaner for cleaning up the mess.
You’ll need drop cloths or plastic sheeting to protect floors from mess and goggles and masks for safety.
To replace any lost material due to water damage, you’ll need new wall framing and best drywall mud, and paint.
Step 02: Inspect the Damage
Once all necessary supplies have been collected, it is time to inspect the area of wet drywall in the bathroom thoroughly.
Look closely for signs of water damage such as discoloration, mold growth, soft spots on walls or flooring near where the water damage occurred, and buckling drywall caused by excess moisture buildup behind wall surfaces.
If needed, use a moisture meter or flashlight to determine how far-reaching and severe the damage might be.
Step 03: Prepare the Area
Before you can jump into fixing up your bathroom’s water-damaged walls, it’s important to ensure maximum safety. Ensure the area is cleared of furniture and appliances. Turn off the main water valve and disconnect power sources (if needed). To protect against messes, lay down some drop cloths or plastic sheeting on floor areas nearby.
Don’t forget those all-important safety measures either, protective masks and goggles are an absolute must while making repairs. When you’ve taken care of these steps, then you’re ready for repair time.
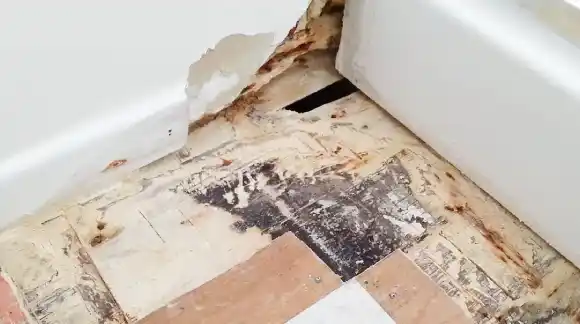
Step 04: Remove Affected Drywall
The next step is removing affected drywall from the wall framing using either a Sawzall or reciprocating saw.
When cutting out sections of drywall, it is important to take care not to injure oneself or damage adjacent surfaces or framing members.
Any screws or nails removed from wall framing should be kept safe as they may be needed later on in the drywall repair process.
It is also important to mark any studs that may need moving later on in order to ensure that all structural support remains intact after repairs are complete.
Step 05: Clean Up Debris & Excess Moisture
After all damaged sections of drywall have been cut away it is important to clean up any debris that has resulted from this process as well as excess moisture present in the area.
This can include vacuuming up dust particles with a shop vac or industrial-strength vacuum cleaner before mopping up the remaining standing water with squeegees and mops.
If necessary, a sump pump can be used to remove larger volumes of water more quickly before proper disposal of debris by landfill means can take place.
Step 06: Install New Wall Framing
Once all affected material has been removed from your bathroom walls, it’s time to install new framing and drywall material in its place.
Start by using construction adhesive to secure vertical 2×4 studs into place between two joists in your wall cavity (measurements should correspond with existing walls).
Add additional blocking between joist spaces if needed to provide extra support for a new section of drywall that will be added later on in the process. Secure studs with nails or screws as desired.
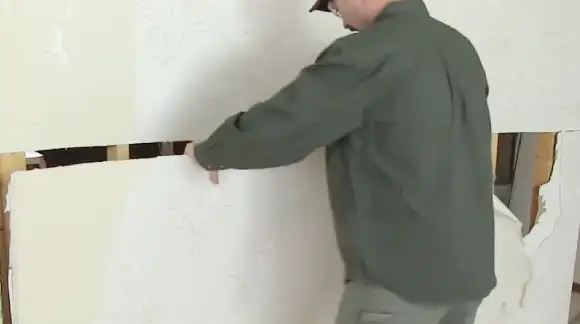
Step 07: Install New Drywall
After confirming that studs are properly spaced and secured within the wall cavity, you can start installing new sheets of drywall onto them one at a time. Use special screws made specifically for this purpose rather than nails when possible to ensure better stability over time (check local codes regarding drywall screw lengths before beginning the project).
Apply tape along all edges where two sheets come together and proceed to cover the entire wall area until you’ve reached your desired height/width dimensions (ensuring measurements are consistent throughout). Then, cut out around any electrical boxes or other protrusions as needed before moving on to the next step.
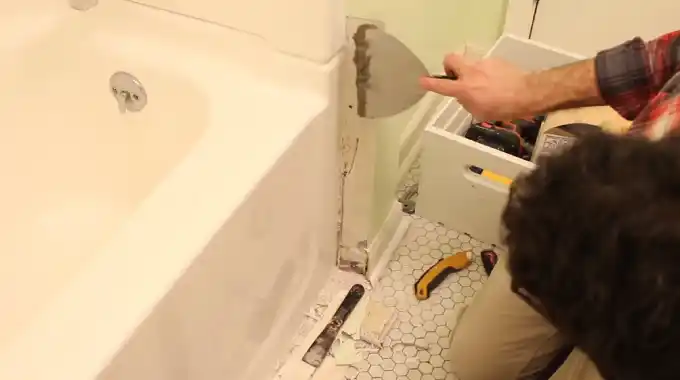
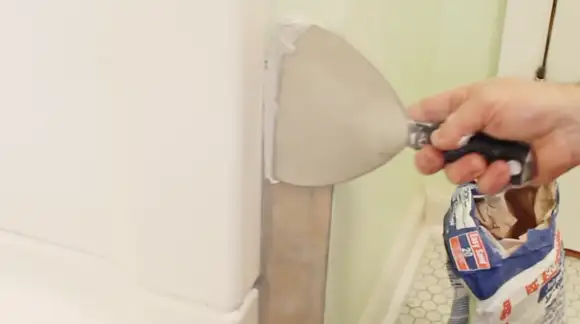
Step 08: Seal Joints
To finish off repairs, seal all joints with joint compound (also known as “mud”), apply it using a trowel or putty knife, and smooth out seams until they are flush against surrounding surfaces.
Repeat the process until desired results have been achieved (you may need multiple layers depending on the size/depth of cracks).
Once everything has dried completely, sand the area lightly to finish off repairs. Take care not to over-sand, as this could cause further damage.
Step 09: Apply Texture & Paint
Once all joints have been sealed properly, the walls will need some texture applied over the top and then finally a coat or two of paint depending on desired finish level desired by the homeowner (flat/eggshell/semi-gloss).
Use a fine nap roller brush dipped into your chosen texture, and roll it onto walls in an even fashion taking care not to leave any visible lines behind while doing so before applying paint over the top when ready.
Step 10: Final Inspection
Once everything is completed, examine each area closely one last time, paying special attention to detail work such as how well corners were mitered together. Does the joint compound look smooth when painted? Are there any gaps between sheets?
If anything appears off, take extra measures to ensure everything looks perfect before calling the job complete.
How Long Does It Take for Mold to Grow on Wet Drywall In the Bathroom?

Depending on the temperature, humidity levels, and the amount of airflow in the room, mold growth can occur within 24 to 48 hours when wet drywall is present in a bathroom setting.
If the environment is cooler and there is less moisture present or lower humidity levels, it could potentially take much longer for mold spores to begin propagating and colonizing on the surface of the wet drywall.
Can Mold Be Removed From Bathroom Drywall?
Mold can sometimes be removed from drywall surfaces if it has not infiltrated too deeply into the wall material.
Specialized cleaning agents are available, which are designed to kill mold and mildew spores without damaging the surface of the wall.
If the mold has penetrated deeply into the wall material, then cutting out and replacing that section may be necessary to prevent the further spread of mold throughout your home.
Does Mold On Bathroom Drywall Spread?
It’s true that mold on bathroom drywall can spread if you don’t treat it right away. Mold spores can travel through the air and cause an infestation throughout a home if not contained.
The moisture that accumulates in bathrooms creates an ideal environment for mold to thrive, so any existing mold should be removed immediately before it spreads. Regular cleaning and ventilation of bathrooms can help reduce the risk of mold growing on the drywall in the first place.
Possibly a Good Match: Drywall mold: How do you stop it?
Is Drywall Ruined If It Gets Wet Once?
No, drywall is not necessarily bad once it has been wet as long as the area dries out relatively quickly and any water damage is dealt with in a timely manner.
If the drywall is exposed to a large amount of water over an extended period, it will become irreparably ruined due to saturation from moisture which will cause the drywall’s structure to weaken and eventually crumble away.
It’s important to note that even small amounts of moisture left behind after cleaning up a spill can lead to mold growth which could further damage your walls over time.
How Can You Tell If Mold Is In Your Bathroom Drywall?
Mold growth in bathroom drywalls often has a distinctive musty smell or a visible discoloration in patches or streaks on walls or ceilings, which may appear black, green, yellow, orange, or white depending on the type of fungus present.
Some species of mold have fuzz-like textures which may also be visible in certain conditions. If you notice any of these signs in your bathroom walls or ceilings, there may be an infestation present which should be addressed immediately by taking appropriate measures. Such as thorough cleaning and dehumidifying of the area to prevent further growth of mold colonies.
Fix The Wet Drywall And Get Beautiful Walls
Repairing wet drywall in your bathroom doesn’t have to be a complicated process. If you follow our detailed instructions above, then you should be able to get your project done quickly and easily.
Taking the time now to ensure that all of the necessary steps are being taken will help ensure that there are no further issues with moisture or structural integrity down the line.
Once everything is finished with texturing and painting, don’t forget to do one last sweep of the area to ensure everything looks great.
With these tips in mind, you should now have all of the information needed to successfully repair any wet drywall issues that might come up in your home or around your property.
Recommended Article To Read:


